
Painting Samson – Part 1: Paintwork
I thought readers might be interested in following the painting stages of Samson as we begin the final stages of construction and gather the many components together to create a locomotive…
Below: This photo has appeared here before, but I include it again as a fitting ‘starting’ point for this theme. It is a panel I prepared for the paintwork on Samson, including the stages shown sequentially to the left. The lining and borders shown are definitive, i.e. the radius of corners and spacing are the reference point for the locomotive itself and give a very hard-copy record and reference for me once I get stuck in to the job.
The numbers describe the various stages:
1. Metal primer onto cleaned bare metal (green here, often red oxide or grey)
2. First coat of high-build undercoat – in this case black – shown after application and rubbing down (whence green primer appearing through)
3. Second coat of high-build applied
4. Undercoats rubbed down
5. First coat of ‘colour’ (Dark Green) applied and flatted once dry
6. Second coat of colour applied
7. Colour layers rubbed back smooth
8. Third coat of colour applied and rubbed back once dry
9. Fourth coat of colour applied (despite being Dark Green, the coverage wasn’t dense enough until four layers were built up)
10. Final rubbing down of paintwork to create a smooth finish free (hopefully!) of defects
11. Varnish applied
Additional coats of varnish may be added at this time, and will certainly be added in the future as the paintwork mellows and ages – both protecting the finish and also maturing Samson’s appearance over time (see how this had such a dramatic effect on Sunderland tram No.16).

Below: I am thoroughly enjoying having a dedicated finishing/painting shop in the RHEC – it is even heated! Here Samson’ bunkers are prepared for painting. Whilst red oxide primed, and one featuring some test colour and lining, the whole lot was rubbed back and given a new coat of primer in contrasting grey.

Below: The grey, applied and drying.

Below: Work has also started on the many castings – the reverser/regulator quadrant/stand and slide bar bracket being featured here. Again both had received protective red oxide primer coats, but both have been flatted, cleaned and re-primed in grey. The brightwork will be brought to a shine with a flap wheel in the angle grinder – the smoother surface being more resistant to rusting than the present ‘naked’ finish. I’m also trying to remember to do the bolts at the same time – though those seen here require attention from the grinder to remove the modern markings (and I suppose really they should be square headed, but they have quite an important role holding the gear shrouds in place – something to revisit in due course).

Below: Moving back to the bunkers, here they are before filling of surface defects. After the grey primer, a coat of high-build black undercoat was applied, then the whole surface was rubbed down and any defects identified.

Below: With filler applied and then rubbed down (so much quicker to write than to do – think how much work Phil puts into a tramcar…!!!), here are the cleaned and tack-clothed (to remove dust) bunkers before another coat of the high-build undercoat is applied. This is done at the end of the day after everyone else has gone home – to reduce the dust from massing and curious traffic!

Below: With the undercoat still wet (it will dry smooth and lose its gloss seen here), the to bunkers are carefully left overnight to dry. They will be rubbed down again before another coat of black is applied – this being the recommended undercoat for the Dark Green colour chosen for Samson. All of the paints I am using on this project are from the Craftmaster range. The trams and buses etc. that you see painted by Phil Anderson on these pages generally use Williamsons (Ripon) paint, though with Craftmaster varnish. Choice is very much subjective and I have stuck with what we used on Coffee Pot, the Steam Mule and Lewin, and its what I’m using on my own motor roller.

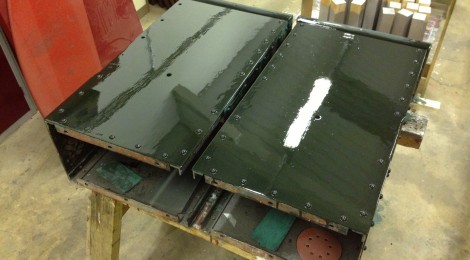
Below: The bunkers with their final coat of dark green applied, the last of three such coats, each rubbed back in between application and also having had a fairly heavy rubbing due to dust contamination of the paint and a strange reaction on one bunker that caused the coat to shrink back and ripple. So far so good with the final coat and this will be allowed to harden before being rubbed back once again before lining out, varnishing and detailing. The latter includes the black beading, interior surfaces and reverse of the bunkers. They will then be ready to fit… I’ll cover the lining in a separate post.


Recent Comments