
T&I News Week 28 2016…
This week we take a look at the RHEC activities, which continue unabated whilst the site is busy with visitors and the anticipated school holiday crowds. This also brings to our attention lots of little repairs and jobs, which are usually tackled by the Site Support team members of Transport & Industry, who are also progressing a number of projects in between attending to blocked toilets or faulty sinks etc. On the electrical side, a review of lighting is underway and this has a development component to it, with period fittings being refurbished for use in the Colliery, as part of an anticipated programme of replacing the modern lighting on site with period fittings. The Colliery is the guinea pig for trialling this approach and more will be shown of this on the blog in due course.
RHEC Technician (Engineering)
Below: We start with the varied workload of Chris Armstrong, showing recent work completed in the RHEC and illustrating something of the huge variety. These first images show replacement pipework being manufactured (and then installed) for the modern boiler in the boilerhouse (located in the Colliery). Initially in for repair, it proved easier to start from scratch.


Below: The Rotherham Daimler bus had a number of trips out earlier in the year and one comment from the drivers was that they were struggling to see backwards using the side mirrors. This is particularly important at Beamish where the number of pedestrians in the roadway can be very high. Chris modified a set of mirror arms as shown in the sequence below, enabling the mirrors to be set further away from the bodyside of the bus.


Below: We’ve seen the lead mine waggon bearings previously, but here are some close-ups of the jig made by Chris and Dave to enable the bearings to be white-metalled.


Below: Whilst Portbury was with us the clack valve on the fireman’s side began to pass quite badly. Here is the casting with the valve seat being faced following clocking, and then the valve itself after tidying up to restore the fit between valve seat and valve.


Below: A new heat shield for the Wolseley car is seen here being made, with the pattern and source material in the first photograph and the shield in place in the second image.


Below: A large number of metal crates have been modified for use in the recovery of materials from Spainsfield Farm.


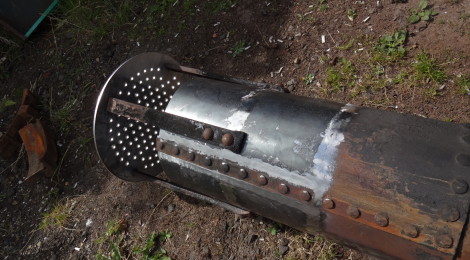
Below: The Waggonway locomotives have quite an appetite for chimneys, with the aggressive environment of ash, water and heat quite rapidly rotting them away. Here is Puffing Billy’s chimney receiving new sections of metal plus a new water arrestor (not a spark arrestor as might be thought!) which was made for us in stainless steel. The first view clearly shows the condition of the chimney after a decade in use.


Below: The B Bus required one chassis rail plating, where a historic modification had created a weakness. The frame was plated and then the mounting pedestal for the handbrake had to be modified to reduce its thickness corresponding to the thickness of the plate, as this was an adaptation when the bus was created on a Bedford VAL chassis many years ago.


Below: Work continues on the Fordson, with the doors now repaired pending painting. The hinges and lower sections have all received attention, these being the wrong type of door for the date of vehicle and so have been modified with mixed success before we purchased it. They are now a far more secure arrangement with most of the rot also removed. Next job on this vehicle is to replace the sills.


Below: The wings of the Fordson have been shot-blasted, revealing them to have had something of a hard life with lots of patches and stitching! These will now be filled and built back to shape before painting and re-fitting.

Leyland Cub Tipper
Below: Work to recommission the tipper continues, with the electrical system overhauled, the dynamo sent for professional attention and a new battery isolator fitted. The rear light clusters have been changed for a more appropriate style and the windscreen wiper motor replaced. The tipping gear was checked over then tested and found to work well – the body can tip three ways depending on which retaining catches are released. It has suffered some damage in the past which will be repaired and we may line the floor with steel sheets to protect the floor and enable loads to be tipped more easily. Here the body is tipped towards the nearside.

Below: Now the body is tipped to the offside – the pump runs off the gearbox and is activated by a lever in the cab and then releasing the clutch whilst the gear selector is in neutral. The body remains in any position, until lowered using a lever on the nearside. Brian and Alan officiate.

Below: This close-up of the ramps shows how they can move to accommodate the body movement – essentially by releasing the appropriate catches, the body will tip to the opposite side, this being the route of least resistance. Clever.

Below: The conventional rearwards tip is demonstrated here. A tether pulls on the release lever when the limit of tipping is reached, to prevent over-tipping of the body. In theory it could tip forwards over the cab, though such an action would not be desirable!

Below: The guys have also been working on the Morris to correct the leaking fuel tank filler neck and to paint the chassis before the body is fitted.

Below: The Model T Ton Truck has had the radiator removed for some warranty work (following leaking after recent repair by a contractor). As will be seen in other posts, this vehicle is scheduled for some extensive renovation in the not too distant future.

RHEC
Below: Tony, Matt B and Bill have been busy on the NER hut, seen here with the internal panelling and insulation being fitted.


Below: The painting of the exterior is now largely complete, with colours to match the existing scheme at Rowley.

Below: Bill, one of the midweek volunteers, cleans up the downpipes for the guttering, new guttering being fitted to the hut.

And finally…
In my own collection of lamps for road-making and road-rollers I have had these two Wells No.18 cast iron flame lamps for some time. These were used alongside roadworks to illuminate the works at night as a warning to road users of potential holes or obstructions. Often to be seen around a slumbering steam or road roller too. The main problem with them is finding the wicks, which are about 1.5 inches in diameter and not available anywhere that I’ve been able to find. I had considered winding a flat wick around an armature but in the end David Young mentioned he had a length at home dating back decades and wondered if this would suit. As it happened it suits very well, with sufficient for both lamps, seen here on a test ‘run’ using paraffin. This rather inspires a few night-time photographs using the roller, its lamps, some hurricane lamps and these to recreate a scene that is certainly long-lost from life today…


Night time shoot soon…?